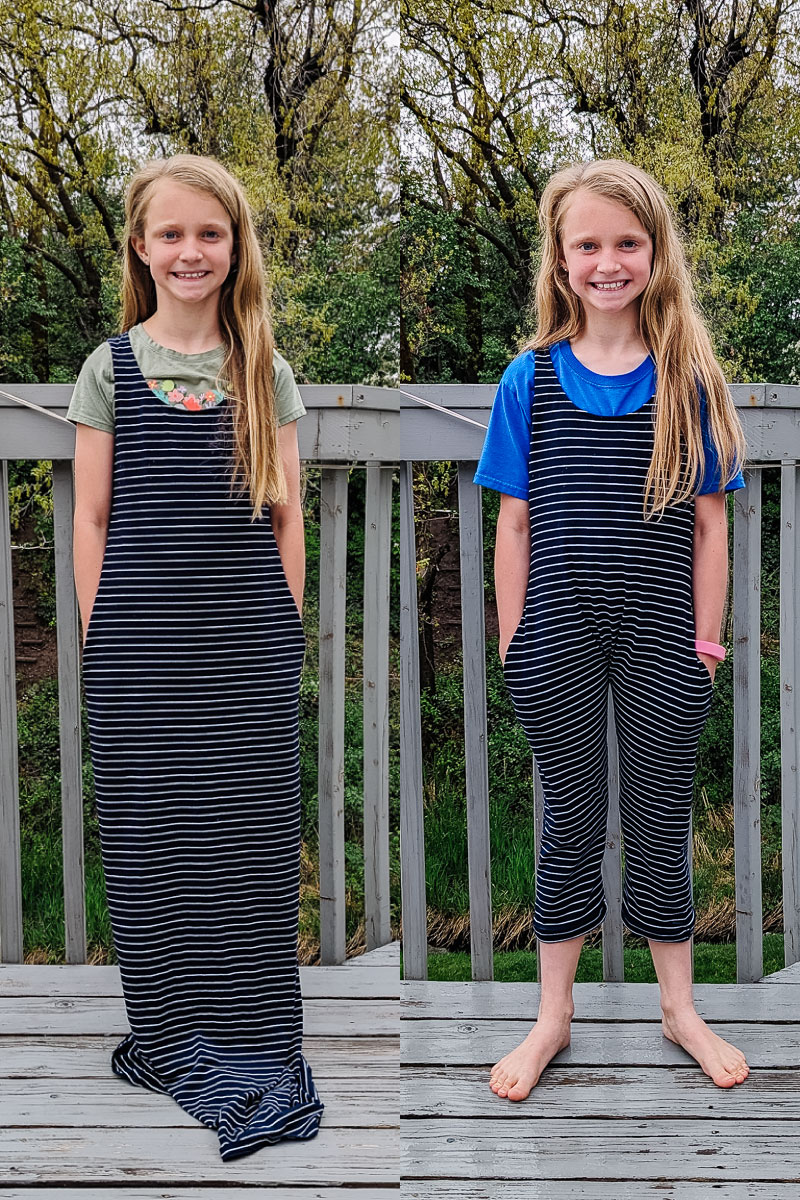
Our upcycle sewing inspiration continues with a brand new tutorial for turning a dress into a romper! Heather from Heather Handmade does a lot of cute upcycles for kids and has several patterns available! We are excited to welcome Heather to the PRP blog today!
Hi! I’m Heather from Heather Handmade. I believe small sewing moments can create great joy. I’m so excited to be here to share an upcycle tutorial with you!
My daughters love to wear rompers. (Let’s be honest, so do I!) They are so comfy and perfect for playing all day.
I have a romper that I love that is a little bit of a dropped crotch, loose fit style, and whenever I wear it I know I can make something similar for my girls. I realized it would be so easy to create the style by upcycling or refashioning a dress.
I turned two dresses into rompers, and I’m sharing the tutorial so you can make one too!

What dress will work for this upcycle project?
You must use a knit dress for this project to work. You need the stretch and movement of knit, or this project won’t work. If you can find a dress with pockets, even better! Both of the dresses I used had pockets, but I ended up moving the pockets on the pink dress higher for my shorter daughter.
The dress should be an a-line style dress with no horizontal seams. The more flared the dress, the looser ( more bunching of fabric at the center front and center back) it is. It can be any length, and you can shorten it if you need.
Also, it’s very important that the neckline is open enough to slide the dress up the legs and onto the shoulder. Once the dress is a romper, it cannot slide over the head to be put on.

What do you do about the center front and center back curve of pants?
On a normal pair of pants, there is a front and back crotch curve to fit a 3D body. This makes it so the pants can contour and shape around a body and remove some excess fabric.
This style of romper is a loose fit, drop crotch style. The front and back crotch curves are eliminated which leaves excess fabric and some fabric bunching in the center front and the center back. The striped dress I upcycled wasn’t as flared so there’s minimal bunching. The pink dress I upcycled was very flared so there’s a lot of bunching.

How do you put this romper on and take it off?
This romper is put on by sliding up the legs and onto the shoulder. That means that the dress neckline must be open enough to slide up the body, or the romper won’t be able to be worn once you sew up the bottom.

Looking for more? Upcycle projects you might love:
How to Turn a Dress into a Romper
Supplies
- Knit fabric knee length or maxi length dress with an open neckline
- Sewing tools
- Sewing machine

If the dress is too long, then put the dress on your child. Mark the length you want, like a shorts or cropped length.

With the dress on the child, mark the top of the inseam curve. Make sure you drop down a couple of inches from the crotch curve for movement. Have your child take the dress off.
Use a marking tool to mark the inseam curve. Draw out the leg seams. You’ll have better luck with a loose fit or wider leg style. I chose a straight leg loose fit that stayed the same width from the thigh down. Mark out the seam allowance.

Cut the arched piece of fabric out of the dress.

Pin the inseam with right sides together.

Sew the seam with either a zigzag stitch or a serger. I actually ended up serging and sewing with a zigzag stitch. The inseam gets a lot of wear and tear so I didn’t want the seam to pop later.

Hem the pants the way you want. I folded the hem up 2 inches towards the outside of the pants for a cuffed look. I sewed around the top fold with a straight stitch.

Press the hem and the inseam towards the back of the romper. You are finished!

The other dress I chose had a really fun ruffle at the bottom so I kept that as part of the look. The neckline and shoulder straps were a little too wide for my little daughter so I added a row of shirring across the shoulders to bring them in and a row of shirring around the neckline to bring it in.

If you make something using this tutorial, I’d love to see! Please share it on social media with the hashtag #heatherhandmade and tag me!
Thanks so much, Heather! We hope that this has inspired you to give upcycling a try! Heather has several different upcycle sewing patterns and we will be doing a giveaway in our Facebook group this weekend! Make sure you have joined the group to get special freebies and giveaways every week!
Heather is also hosting a PRP giveaway! Click HERE to enter!
Don’t forget to join our upcycle challenge this month!
Save this image to Pinterest to find this DIY upcycle tutorial later!
